
IBM Rational Team Concert
Task tracking � Source control � Agile planning
Rational Team Concert 6.0 New & Noteworthy
Rational Team Concert is an integral part of the Rational solution for Collaborative Lifecycle Management (CLM). For new and noteworthy information about other CLM applications, see these pages:
- Jazz Foundation (Jazz Team Server) 6.0
- Quality Management 6.0
- Requirements Management 6.0
- Jazz Reporting Service 6.0
- Rational Engineering Lifecycle Manager 6.0
New in previous versions of Rational Team Concert
For details about new features and functionality in previous releases, see these pages:
- Rational Team Concert New & Noteworthy 5.0.2
- Rational Team Concert New & Noteworthy 5.0.1
- Rational Team Concert New & Noteworthy 5.0
- Rational Team Concert New & Noteworthy 4.0.7
New in Rational Team Concert 6.0
Global Configuration Management
The following updates are available in this release:
- A new personal streams feature is available that provides cross-product lifecycle context, so that you can create and remove links across project areas and work on a change set without changing the main global stream.
- Permissions are now defined for creating and modifying components, streams, and personal streams. In addition, three roles are defined in the default process template: Contributor, Baseline Maker, and Configuration Lead. Team members without an assigned role have only read-access to global configurations.
- The term "baseline staging stream" replaces "staged baseline" in the interface.
Tracking and Planning
Planning
Plan editor in Eclipse client is removed
In Rational Team Concert versions 6.0 and later, you must view plans in the web client. The planning editor for the Eclipse client is available in versions earlier than 6.0, but new features were no longer added to the Eclipse client after the 4.0 release because the Eclipse version was deprecated.
Scaled Agile Framework (SAFe) 3.0 for a program and teams
A predefined process template to support Scaled Agile Framework (SAFe) 3.0 is now available. It can be used to accelerate the adoption of SAFe, leveraging the automation of Rational Team Concert to manage key SAFe artifacts, such as program epics, features, PI objectives, and Kanban boards. It also supports key SAFe events, such as release planning, iteration planning, and retrospectives. This template is designed to support a single project for a program and teams, but it can also be used to establish separate Rational Team Concert project areas for SAFe programs and SAFe Teams. For more information, see IBM SAFe Support and Scaled Agile Framework (SAFe) process template.
To download the Scaled Agile Framework (SAFe) 3.0 process translated work item templates, see the Downloads tab.
Plan performance
Plans can now be "scoped down" based on their attribute values, reducing the number of items to fetch during the initial load. This is useful for plans with a large number of items, particularly for items that you don't normally want to see, such as resolved items. Supported attributes for scoping are type, state, and filedAgainst. You can specify items with the following syntax: attribute:value. For example, type:defect loads only the plan's defects wherever possible. You can make the match exclusive by prepending it with an exclamation point. For example, !type:defect loads only non-defects wherever possible.

If a de-scoped item has in-scope ancestors and descendants, it is shown to complete the hierarchy, but it is marked as belonging outside of the plan.

With the Delayed Loading feature, hierarchical plans load items on demand, lessening the initial load times for the plan. Delayed loading is used wherever possible. If a root item at the top of a plan is excluded or otherwise hidden, its descendants must be fetched in case any of the descendants are visible. As a result, plans with many root-excluded items might not have performance gains through delayed child loading.
In Rational Team Concert 6.0 performance testing with both features, the load time for a 1,956-item plan was measured. The plan used a parent-child tree display, and 900 of its 1,956 items were hierarchy roots. The remaining items were internal nodes or leaves. The plan had 114 execution items (tasks and defects) that could be de-scoped, and 464 resolved items that could be de-scoped.

As an example (using IE10):
- When de-scoping execution items, the test plan saw a 23% performance gain.
- When de-scoping resolved items, the test plan saw a 27% performance gain.
- When de-scoping both execution and resolved items, the test plan saw a 31% performance gain.
- When using delayed-child loading without scoping, the test plan saw a 40% performance gain.
- When using delayed-child loading along with de-scoping both execution and resolved items, the test plan saw a 51% performance gain.
Across all browsers, depending on the above configurations, load performance of the test plan improved by 15% to 51%. With the maximal configuration (de-scoped execution and resolved items with delayed-child loading enabled), load performance of the test plan improved by 40% to 51%. These metrics vary with the shape of the plan's trees, the scope expression used, the amount of de-scopable items, and the plan's view configuration.
Ranking in hierarchical plans
The rank column in plans, which uses the parent-child tree display, now reflects the tree hierarchy. The "Apply Rank" button and the menu items, "Apply Rank Above" and "Remove Rank Below," are now enabled for tree views that are not grouped.

The rank of plan items is shown in hierarchical format in all views that use a tree display, including cross-project plans. The Apply Rank button is now enabled in grouped views.

Microsoft Project Integration
Microsoft Project, version 2013, is now supported for import and export.
Microsoft Project performance improvements
- Exporting a plan to Microsoft Project XML format is now considerably faster. It now takes less than a minute to export a plan containing 2,000 items, which is more than 10 times as fast as it took earlier.
- The time that is required to re-import a plan in Microsoft Project XML format is reduced significantly. The first-time import of a Microsoft Project XML file is about 10% faster.
Re-importing an XML file into a plan that it was previously imported is up to 10 times faster than in previous releases. The actual performance gain depends on the file that is being imported.
Note: The numbers are based on an "ideal test bed and test bed scenario" and are not directly mappable to real world results.
Cross-project plan improvements
The Cross-Project Planning Problems Check has additional validation to highlight unassigned and unplanned tracked items.

The tracking of items that contribute to releases across projects is now improved.
- Contributes To Planning Problems Check: This new plan check annotates work items with potential planning problems for the tracking item that it contributes to.
- Earliest Contributes To End Date: This new attribute can be added to an execution plan to track the early release end dates that the work item contributes to.


Note: All plan checks now ignore resolved and closed work items on a plan.
Kanban and Taskboard view: Select All/Deselect All
To facilitate easier and faster state selection in a Kanban or Taskboard view, users can now select or deselect all states in the Kanban board, as well as select and deselect all states within a specific state group.

Quick Planner
Ranking improvements
You can now drag items from the Recently Created section and drop them into the Ranked List section to rank them. The rank of the item is now displayed in the Iteration Planning view.

Additionally, you can now click the rank number and assign a new rank to the item without dragging and dropping.

Cross-project children
The Backlog and Iteration planning views now display cross-project children links. You can edit the values of the children the same as you edit work items that belong to the same project.
Display count of items
The count of work items is now displayed on each of the Quick Planner views. For views that have paged results, the count includes the work items that are not yet loaded. The count is updated as work items are added or removed from the view. When you filter a view, the work items are updated.


Iteration planning: selected iteration
The Iteration Planning view is now more manageable. The view displays the parent iteration, the selected iteration, and the next two sequential iterations. Additionally, the title of each lane also shows a start and end date of the iteration.

Task Breakdown improvements
- In the Task Breakdown view, you can now click the header to open the work item editor and make changes.
- Previously, you could only access the task breakdown view from the Backlog or Iteration Planning views. You can now access the task breakdown action from any view, whether it is My Work, Team's Work, or All Work. This is invaluable, for example, when you are assigned a story and want to break it down without leaving the My Work view.
- An existing child task can now be added directly within the Task Breakdown view. Click Add Existing, filter the list of work items, and select one to add as a child.


Keyboard shortcut to set "planned for" attribute
You can now set the planned for attribute using the tilde (~) keyboard shortcut when you create a work item.

Grid is now table
The grid view is replaced with a more informative table view. The new table view displays items in a condensed form. Each view has various columns to show the information, so you can quickly search a large list of items.

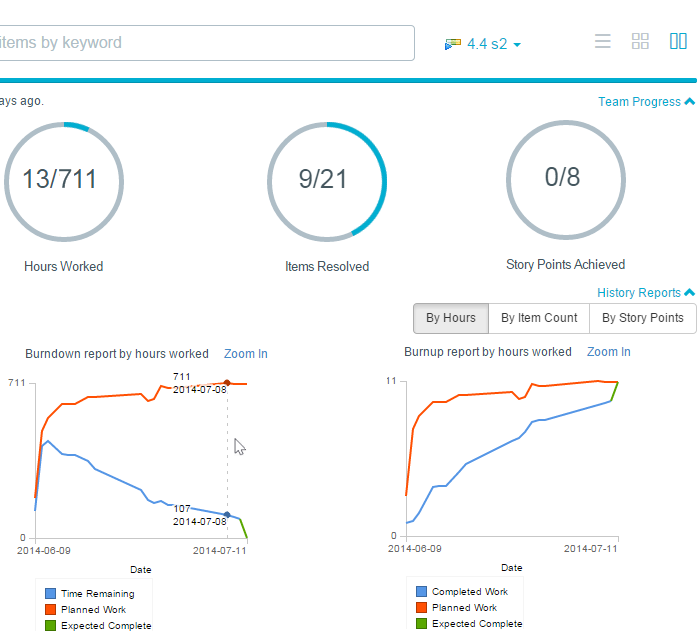
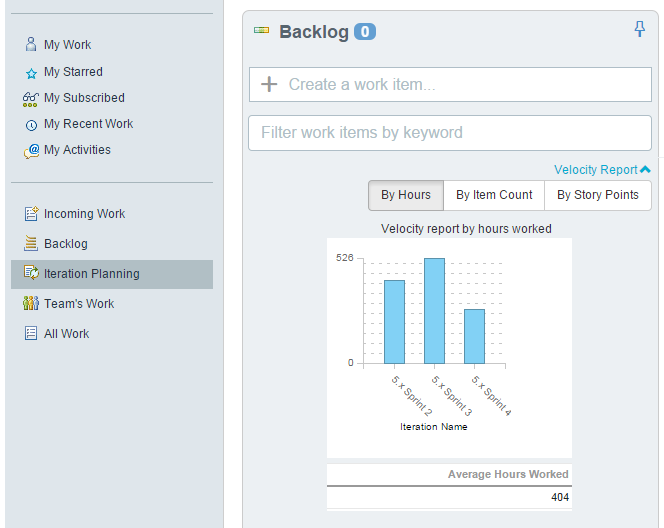
Embedded reports
Several Jazz Reporting Services predefined reports are embedded into the Quick Planner interface. The Team's Work page now has a History Reports option that offers three burndown and three burnup reports. The reports run specifically for the iteration, which is selected as the current context. If the iteration does not have children, the reports show progress from the start to the end date of that iteration. If the iteration does have children, these reports represent the release burndown and burnup reports that show the status at the beginning of each child iteration. The Iteration Planning page now has a History Reports option as well, which includes an average velocity report for up to three previous iterations.
Quick Planner small-screen UI improvements
The Quick Planner UI is completely tuned for small-screen touch mobile devices. You can now easily view and modify work items using Quick Planner on your small-screen mobile device. Small-screen UI improvements include easy readability of work items without having to zoom in, intuitive small-screen based navigation, and touch-friendly interfaces for quickly creating new work items and filtering existing ones.

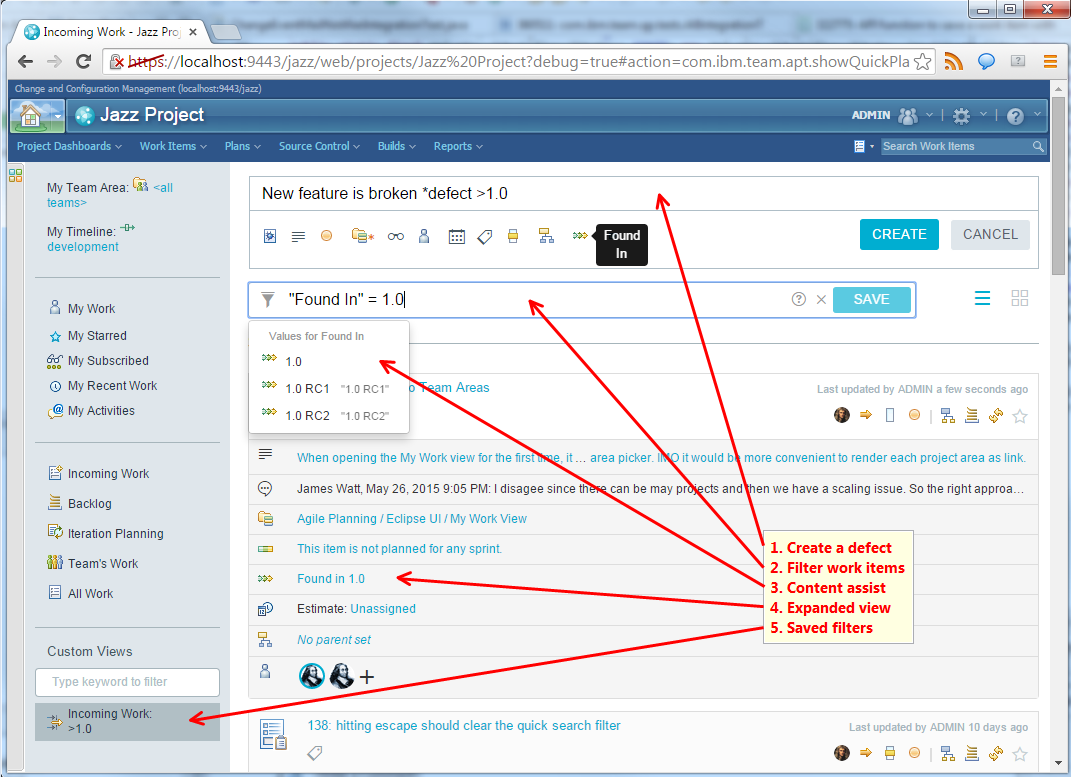
Added Found In support
Updated support for Found In in all Quick Planner views.
- Create a defect with the > syntax.
- Filter work items with "Found In" = syntax.
- Content-assist displays a list of releases.
- The expanded view shows the Found In value.
- The saved filters store the Found In value.
Quick, powerful, and easy filtering
Filtering in Quick Planner is more expressive and powerful, while retaining the simplicity and ease-of-use. Filtering now supports the following features:

Attribute filters
In the previous release of Quick Planner, you could filter work items with a limited number of attributes, such as priority, severity, ownership, and etc. In Rational Team Concert 6.0, you can filter work items with all enumeration-type attributes, including the ones you customize yourself, in the project configuration. For example, you can filter work items filed against a specific category, or you can filter work items found in particular releases or with specific number of story points.

Logical operators
You can use logical operators, such as "and," "or," and "not" in your filter criteria. You can even have complex operations that nest multiple logical operators that use simple and intuitive syntax.

Full content assist and auto-complete
Even though filtering has become more expressive and powerful, writing your filter query is now easier than before with full content assist and auto-complete. The filter box shows you proposals on every keystroke and guides you in the creation process, from simple filters, like the ones with short syntax, to more complex filters that use logical operators.

Search phrases and short forms
You can type in a keyword or a work item number to look only for that keyword or work item respectively. You can also continue to use the short syntax we defined in previous releases, such as type (*), tags (#), priority ($), severity (!), and owned by (@:).
Quick-create
Extended attributes
You can now quickly create work items with any enumeration-type attribute, which enables you to use the quick-create functionality over the full work item editor to create new items when there are required attributes. Use this, for example, to quickly create stories with a specific number of story points.

Work items
Aggregate change notifications
You can now aggregate changes that occur to the same work item in a single e-mail, ensuring that you do not receive a large number of e-mails for changes within the same notification interval.
A simple aggregate template is provided by default. To customize your templates, see the project administration page.

After you upgrade to Rational Team Concert 6.0, this support is enabled by default. You can turn it off in the CCM Advanced Properties page by setting the "Aggregate Same Work Item Changes in Single E-mail" property.
Floating header improvements
The floating header in the work item editor now includes the work item's summary. This header has also been reduced in size in order to make it more manageable.

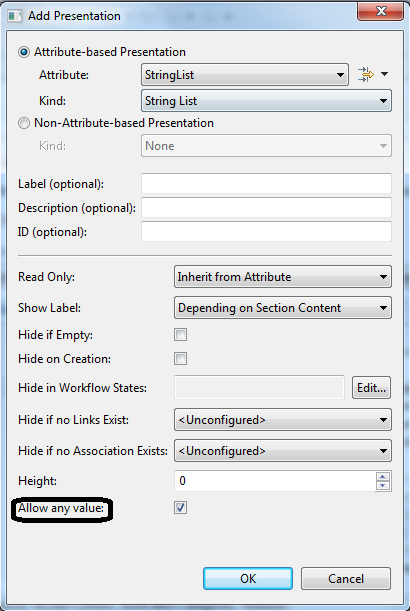
New string list property prevents values
The new property, "Allow any value," is added to the String List presentation. When the value is false, this property prevents you from adding non-provided values.
OSLC (1.0) Query API result limits removed
The query results that are returned with OSLC APIs (1.0) are no longer limited by the value of the "Maximum Query Result Set Size" advanced property on the server.
Product Lifecycle Engineering (PLE)
Releases can be associated with global configurations and iterations.


OSLC link types that reference quality and requirements management resources can be associated with deliverable attributes.

Work items can be linked to versioned quality and requirements management resources.
Links to versioned resources reflect changes to the deliverable attributes when a work item is saved.
Work item links in the Plan editor and Query Results view in the web client now support navigation and rich hover for versioned resources.
The Eclipse client now supports navigation and rich hover for versioned resources in the Work Item editor.
The Query Results view in the Eclipse client now supports the creation of links to existing versioned resources and the creation of new versioned resources. If multiple work items are selected for bulk adding a versioned resource, the global configuration context is picked from the first selected work item.
Changes to the OSLC Link Type mapping is reflected in the work item links shown in versioned quality management and requirements management resources.
The Edit Iteration window now shows any releases that the iteration is associated with.

The Client for Microsoft Visual Studio IDE now supports navigation and rich hover for links to versioned resources from the Work Item editor.

The Eclipse client and the Client for Microsoft Visual Studio IDE now support creation of links to existing versioned resources and the creation of new versioned resources from the Work Item editor.

The Query Results view in the Client for Microsoft Visual Studio IDE now supports navigation for links to versioned resources.
Linking to existing work items from versioned requirements or test artifacts opens a selection window, where work items can be filtered by the value of the deliverable attribute, which is mapped to the current global configuration.

Linking to new work items from versioned requirements or test artifacts opens a creation window, where work item deliverable attributes are preset to values that are mapped to the current global configuration.
For more information, see Linking work items to artifacts in Configuration Management-enabled project areas.
Jazz Source Control
Custom attributes
The support for custom attributes includes more artifact types. In addition to source file versions, custom attributes are now supported for baselines, snapshots, and streams.
You can create custom attributes for supported artifacts and then query the artifacts later, based on the value of these custom attributes.
This feature supports extensibility and traceability for source files, baselines, snapshots, and streams. Here are some examples of how it can be used:
- A developer can record more comments about a specific file version, baseline, snapshot, or stream without changing the state of the artifact.
- A development lead can write a script that runs a static analysis tool on the team's source code. The script saves the file-specific errors or warnings to an attribute on specific source-file versions.
- To comply with a company's intellectual property policies, a team can create a custom attribute, such as protected_IP, and set its value to true for files with IP significance. The project manager can use that attribute to prepare IP reports for each release by querying all file versions in that release, where the property protected_IP is true.
- Code inspection information can be recorded on source code, such as whether the file version has been inspected and who inspected it.
- A release engineer can set a custom attribute on a baseline to indicate its status, such as new, in_testing, published, released, or rejected.
- A release engineer can set a custom attribute on baselines and snapshots to indicate the release number.
- A team can set a custom attribute for a stream to help users of the stream know the release number or the purpose of the stream.
Setting and querying for custom attributes is supported in the command-line interface. This feature is useful for scripting and customization.
Tags
A special custom attribute called tags is now supported, which is a predefined custom attribute that can be used for source file versions, baselines, snapshots, and streams. The tags attribute can store zero or more tag values. Users can run a query from the command line to retrieve artifacts where the tags attribute contains a specific tag value.
You do not need to specify the special custom attribute tags in the attribute definition for the different artifact types. By default, it is available for all supported types and is not shown in the Web UI attribute definition.
Defining custom attributes
Before you can create a custom attribute on file versions, baselines, snapshots, or streams, the custom attribute must be defined in the project area.
Custom attributes are defined by using the web client. To define custom attributes, you must have administrative access to the project area.

A custom attribute can be applied to more than one artifact. When the custom attribute is created, you can indicate what artifacts are used in that custom attribute. The web client shows the name of artifacts that are applicable to each custom attribute. Note that the new version behavior is applicable to only file versions and not baselines, snapshots, and streams.
The web client also supports filtering of custom attributes, based on the artifact types.
If an artifact is part of a component that is a member of multiple project areas, you can only set a custom attribute if it is defined in all parent project areas.
The name of a custom attribute is not allowed to be same as the name of built-in attributes. For example, name is a built-in attribute. Also, each artifact type has its own set of built-in attributes. It is possible that an attribute name is allowed for one artifact type but not for the others. A custom attribute named comment is allowed for files but not for baselines, snapshots, or streams. After a custom attribute is created, it might not be possible to add additional artifact types later.
Creating and modifying custom attributes
Use the following command to create or modify the value of a custom attribute:
Usage:
scm set custom-attribute -v/--file <arg ...> [-d/--directory <arg>]
                         [-r/--repository-uri <arg>] [-u/--username <arg>
                         -P/--password <arg> | --certificate <arg>
                         -P/--password <arg> | --smartCard -u/--username <arg>
                         | --kerberos] <key> <value>

scm set custom-attribute -S/--stream <arg ...> [-r/--repository-uri <arg>]
                         [-u/--username <arg> -P/--password <arg> |
                         --certificate <arg> -P/--password <arg> | --smartCard
                         -u/--username <arg> | --kerberos] <key> <value>

scm set custom-attribute -s/--snapshot <arg> [--snapshot-workspace <arg>]
                         [-r/--repository-uri <arg>] [-u/--username <arg>
                         -P/--password <arg> | --certificate <arg>
                         -P/--password <arg> | --smartCard -u/--username <arg>
                         | --kerberos] <key> <value>

scm set custom-attribute -b/--baseline <arg> [--baseline-component <arg>]
                         [-r/--repository-uri <arg>] [-u/--username <arg>
                         -P/--password <arg> | --certificate <arg>
                         -P/--password <arg> | --smartCard -u/--username <arg>
                         | --kerberos] <key> <value>

  key   - The name of the custom attribute to set.
  value - The value of the custom attribute.

Options:
  -d, --directory <arg>           - Specifies the root of the shared file
                                    system.
  -v, --file <arg ...>            - The files for which to set the custom
                                    attribute to the specified value. If no
                                    object type is specified, the set command
                                    will default to file type.
  -S, --stream <arg ...>          - This option indicates the stream to set
                                    custom attributes for. To specify the
                                    stream, use its name[@repo], alias, or
                                    UUID[@repo].
  -s, --snapshot <arg>            - This option indicates the snapshot to set
                                    custom attributes for. To specify the
                                    snapshot, use the snapshot name[@repo],
                                    alias, or UUID[@repo].
      --snapshot-workspace <arg>  - The workspace or stream that is associated
                                    with the snapshot. To specify the
                                    workspace or stream, use its name, alias,
                                    or UUID.
  -b, --baseline <arg>            - This option indicates the baseline to set
                                    custom attributes for. To specify the
                                    baseline, use the baseline name[@repo],
                                    alias, or UUID[@repo].
      --baseline-component <arg>  - The component for the baseline. This option
                                    is required if you specify the baseline by
                                    using anything other than an alias or
                                    UUID.

Example:
$ lscm set custom-attribute reviewed true --file src/junit/awtui/AboutDialog.java src/junit/awtui/Logo.java
reviewed successfully set to true

$ lscm set custom-attribute status released --baseline "UI version 2.0"
status successfully set to released
Removing custom attributes
Use the following command to remove a custom attribute:
Usage:
scm unset custom-attribute -v/--file <arg ...> [-d/--directory <arg>]
                           [-r/--repository-uri <arg>] [-u/--username <arg>
                           -P/--password <arg> | --certificate <arg>
                           -P/--password <arg> | --smartCard -u/--username
                           <arg> | --kerberos] [-j/--json] <key>

scm unset custom-attribute -S/--stream <arg ...> [-r/--repository-uri <arg>]
                           [-u/--username <arg> -P/--password <arg> |
                           --certificate <arg> -P/--password <arg> |
                           --smartCard -u/--username <arg> | --kerberos]
                           [-j/--json] <key>

scm unset custom-attribute -s/--snapshot <arg> [--snapshot-workspace <arg>]
                           [-r/--repository-uri <arg>] [-u/--username <arg>
                           -P/--password <arg> | --certificate <arg>
                           -P/--password <arg> | --smartCard -u/--username
                           <arg> | --kerberos] [-j/--json] <key>

scm unset custom-attribute -b/--baseline <arg> [--baseline-component <arg>]
                           [-r/--repository-uri <arg>] [-u/--username <arg>
                           -P/--password <arg> | --certificate <arg>
                           -P/--password <arg> | --smartCard -u/--username
                           <arg> | --kerberos] [-j/--json] <key>

  key   - The name of the custom attribute to retrieve.

Options:
  -d, --directory <arg>           - Specifies the root of the shared file
                                    system.
  -v, --file <arg ...>            - The files from which to remove the custom
                                    attribute. If no object type is specified,
                                    the unset command will default to file
                                    type.
  -S, --stream <arg ...>          - This option indicates the stream to unset
                                    custom attributes for. To specify the
                                    stream, use its name[@repo], alias, or
                                    UUID[@repo].
  -s, --snapshot <arg>            - This option indicates the snapshot to unset
                                    custom attributes for. To specify the
                                    snapshot, use the snapshot name[@repo],
                                    alias, or UUID[@repo].
      --snapshot-workspace <arg>  - The workspace or stream that is associated
                                    with the snapshot. To specify the
                                    workspace or stream, use its name, alias,
                                    or UUID.
  -b, --baseline <arg>            - This option indicates the baseline to unset
                                    custom attributes for. To specify the
                                    baseline, use the baseline name[@repo],
                                    alias, or UUID[@repo].
      --baseline-component <arg>  - The component for the baseline. This option
                                    is required if you specify the baseline by
                                    using anything other than an alias or
                                    UUID.

Example:
$ lscm unset custom-attribute comment --files src/junit/awtui/AboutDialog.java src/junit/awtui/Logo.java
comment custom attribute successfully removed.

$ lscm unset custom-attribute temporary --stream "Temp Stream"
temporary custom attribute successfully removed.
Getting a specific custom attribute
Use the following command to get the value of a custom attribute:
Usage:
scm get custom-attribute -v/--file <arg ...> [-d/--directory <arg>]
                         [-r/--repository-uri <arg>] [-u/--username <arg>
                         -P/--password <arg> | --certificate <arg>
                         -P/--password <arg> | --smartCard -u/--username <arg>
                         | --kerberos] [-j/--json] <key>

scm get custom-attribute -S/--stream <arg ...> [-r/--repository-uri <arg>]
                         [-u/--username <arg> -P/--password <arg> |
                         --certificate <arg> -P/--password <arg> | --smartCard
                         -u/--username <arg> | --kerberos] [-j/--json] <key>

scm get custom-attribute -s/--snapshot <arg> [--snapshot-workspace <arg>]
                         [-r/--repository-uri <arg>] [-u/--username <arg>
                         -P/--password <arg> | --certificate <arg>
                         -P/--password <arg> | --smartCard -u/--username <arg>
                         | --kerberos] [-j/--json] <key>

scm get custom-attribute -b/--baseline <arg> [--baseline-component <arg>]
                         [-r/--repository-uri <arg>] [-u/--username <arg>
                         -P/--password <arg> | --certificate <arg>
                         -P/--password <arg> | --smartCard -u/--username <arg>
                         | --kerberos] [-j/--json] <key>

  key   - The name of the custom attribute to retrieve.

Options:
  -d, --directory <arg>           - Specifies the root of the shared file
                                    system.
  -v, --file <arg ...>            - The files for which the custom attribute is
                                    retrieved. If no object type is specified,
                                    the get command will default to file type.
  -S, --stream <arg ...>          - This option indicates the stream to get
                                    custom attributes for. To specify the
                                    workspace or stream, use its name[@repo],
                                    alias, or UUID[@repo].
  -s, --snapshot <arg>            - This option indicates the snapshot to get
                                    custom attributes for. To specify the
                                    snapshot, use the snapshot name[@repo],
                                    alias, or UUID[@repo].
      --snapshot-workspace <arg>  - The workspace or stream that is associated
                                    with the snapshot. To specify the
                                    workspace or stream, use its name, alias,
                                    or UUID.
  -b, --baseline <arg>            - This option indicates the baseline to get
                                    custom attributes for. To specify the
                                    baseline, use the baseline name[@repo],
                                    alias, or UUID[@repo].
      --baseline-component <arg>  - The component for the baseline. This option
                                    is required if you specify the baseline by
                                    using anything other than an alias or
                                    UUID.

Example:
$ lscm get custom-attribute reviewed --files src/junit/awtui/AboutDialog.java src/junit/awtui/Logo.java
/tmp/cfas/cfa1/JUnit/src/junit/awtui/AboutDialog.java
  reviewed - true
/tmp/cfas/cfa1/JUnit/src/junit/awtui/Logo.java
  reviewed - false

$ lscm get custom-attribute temporary --stream 5425
(5425) "Temp Stream"
  temporary - true
Showing custom attributes
Use the following command to show custom attributes:
Usage:
lscm show custom-attributes -v/--file <arg ...> [-d/--directory <arg>]
                            [-r/--repository-uri <arg>] [-u/--username <arg>
                            -P/--password <arg> | --certificate <arg>
                            -P/--password <arg> | --smartCard -u/--username
                            <arg> | --kerberos] [-j/--json]

lscm show custom-attributes -S/--stream <arg ...> [-r/--repository-uri <arg>]
                            [-u/--username <arg> -P/--password <arg> |
                            --certificate <arg> -P/--password <arg> |
                            --smartCard -u/--username <arg> | --kerberos]
                            [-j/--json]

lscm show custom-attributes -s/--snapshot <arg> [--snapshot-workspace <arg>]
                            [-r/--repository-uri <arg>] [-u/--username <arg>
                            -P/--password <arg> | --certificate <arg>
                            -P/--password <arg> | --smartCard -u/--username
                            <arg> | --kerberos] [-j/--json]

lscm show custom-attributes -b/--baseline <arg> [--baseline-component <arg>]
                            [-r/--repository-uri <arg>] [-u/--username <arg>
                            -P/--password <arg> | --certificate <arg>
                            -P/--password <arg> | --smartCard -u/--username
                            <arg> | --kerberos] [-j/--json]

Options:
  -d, --directory <arg>           - Specifies the root of the shared file
                                    system.
  -v, --file <arg ...>            - The files whose custom attributes to show.
                                    If no object type is specified, the show
                                    command will default to file type.
  -S, --stream <arg ...>          - This option indicates the stream to show
                                    custom attributes for. To specify the
                                    stream, use its name[@repo], alias, or
                                    UUID[@repo].
  -s, --snapshot <arg>            - This option indicates the snapshot to show
                                    custom attributes for. To specify the
                                    snapshot, use the snapshot name[@repo],
                                    alias, or UUID[@repo].
      --snapshot-workspace <arg>  - The workspace or stream that is associated
                                    with the snapshot. To specify the
                                    workspace or stream, use its name, alias,
                                    or UUID.
  -b, --baseline <arg>            - This option indicates the baseline to show
                                    the custom attributes for. To specify the
                                    baseline, use the baseline name[@repo],
                                    alias, or UUID[@repo].
      --baseline-component <arg>  - The component for the baseline. This option
                                    is required if you specify the baseline by
                                    using anything other than an alias or
                                    UUID.

Example:
$ lscm show custom-attribute --file src/junit/awtui/AboutDialog.java src/junit/awtui/Logo.java
/tmp/cfas/cfa1/JUnit/src/junit/awtui/AboutDialog.java
  reviewer - Pete
  reviewed - false
  release  - 4.2
  need_language_review - true
/tmp/cfas/cfa1/JUnit/src/junit/awtui/Logo.java
  reviewer - Sue
  reviewed - true
  release  - 4.1
  graphics - true

$ lscm show custom-attribute --snapshot 5467
(5425) "Build Snapshot"
  build - 6.0 M10 (RTC-I20150302-2051)
  state - passed
Querying using custom attributes
Use the following command to query file versions using custom attributes:
Usage:
lscm query [-v/--file] [-i/--show-versionid] [-f/--show-full-versionid]
           [-r/--repository-uri <arg>] [-u/--username <arg> -P/--password
           <arg> | --certificate <arg> -P/--password <arg> | --smartCard
           -u/--username <arg> | --kerberos] [-j/--json] <query string>

lscm query [-S/--stream] [-m/--maximum <arg>] [-r/--repository-uri <arg>]
           [-u/--username <arg> -P/--password <arg> | --certificate <arg>
           -P/--password <arg> | --smartCard -u/--username <arg> | --kerberos]
           [-j/--json] <query string>

lscm query [-b/--baseline] [-m/--maximum <arg>] [-r/--repository-uri <arg>]
           [-u/--username <arg> -P/--password <arg> | --certificate <arg>
           -P/--password <arg> | --smartCard -u/--username <arg> | --kerberos]
           [-j/--json] <query string>

lscm query [-s/--snapshot] [-m/--maximum <arg>] [-r/--repository-uri <arg>]
           [-u/--username <arg> -P/--password <arg> | --certificate <arg>
           -P/--password <arg> | --smartCard -u/--username <arg> | --kerberos]
           [-j/--json] <query string>

  query string - A query that matches custom attributes of files and
                 directories. For details, see IBM Knowledge Center.

Options:
  -i, --show-versionid        - Show the version ID for files.
  -f, --show-full-versionid   - Show the full version ID for files.
  -v, --file                  - This option indicates the query will search for
                                files matching the query string. If no object
                                type is specified, the query will default to
                                file type.
  -S, --stream                - This option indicates the query will search for
                                streams matching the query string.
  -m, --maximum <arg>         - The maximum number of results that can be
                                returned. The number must be greater than 0.
                                If you omit this option, 10 is used by
                                default.
  -b, --baseline              - This option indicates the query will search for
                                baselines matching the query string.
  -s, --snapshot              - This option indicates the query will search for
                                snapshots matching the query string.

Example:
$ lscm query --file "has_attr(reviewer)"
AboutDialog.java
Logo.java
ProgressBar.java
$ lscm query --file "reviewer = 'Sue' or reviewer = 'Pete'"
AboutDialog.java
ProgressBar.java
$ lscm query --file "(reviewed = 'false' and reviewer = 'Pete') and in_baseline(f81d4fae-7dec-11d0-a765-00a0c91e6bf6)"
AboutDialog.java
The general query supports <expression> and <expression>, <expression> or <expression>, <attribute> = <value>, has_attr(<attribute>), and tags contains <tag>. <expression> can contain combinations of other query functionality grouped by the precedence operators ().
Each artifact type also supports some specific query operations just for that type.
- The file type supports an in_baseline(UUID) function that scopes the query to search for files within a specified baseline. If no scope is specified by using the in_baseline query function, the whole database is searched for matching file versions.
- The stream type supports in_projectarea(<object identifier>), in_teamarea(<object identifier>), name = <literal name> and name matches <pattern>.
- The baseline type supports in_workspace(<object identifier>), in_stream(<object identifier>), in_snapshot(<object identifier>), for_component(<object identifier>), name = <literal name> and name matches <pattern>.
- The snapshot type supports in_projectarea(<object identifier>), in_teamarea(<object identifier>), for_workspace(<object identifier>), for_stream(<object identifier>), name = <literal name> and name matches <pattern>.
The <object identifier> is the UUID, literal name, or alias. An alias number must be prefixed with an amperand (@). The <literal name> is the full literal name, and the <pattern> is a name string that includes an asterisk (*) to match zero or more of any character. The question mark (?) matches one of any character.
Component hierarchies
Note: In Rational Team Concert 6.0, the component hierarchy feature is turned off, by default, because the full capabilities are available only in the Eclipse and command-line interface clients. If you have teams that use the Visual Studio client, leave this feature disabled until a future release when the full capabilities are available for that client.
You can now organize components into hierarchies. Each component can have multiple subcomponents (children) and a component can be shared by multiple parent components.
The subcomponent relationship can be used to represent a dependency or containment relationship between two components. For instance, consider two components:
- GPS, which contains source code for a GPS program
- NavLib, which contains source code for a navigation library
In this example, the GPS program links with the NavLib library when it is built. It would be appropriate to make NavLib a subcomponent of GPS, to show that GPS depends on (and contains) NavLib.
Component hierarchies enable you to track reuse. If the NavLib program were developed independently by one team, and reused by programs developed by other teams, the NavLib team could see which other programs reuse NavLib.
Component hierarchy relationships can change over time. When users add or remove relationships between components, those changes are linked to change sets, and can be delivered to other streams and workspaces in the same way as source code changes are delivered.
When a baseline is created on a component that has subcomponents, the full baseline hierarchy is saved. This enables you to see which versions were used together at any point in time. For instance, if a problem were reported against a specific version of NavLib, the team could find out which other programs were affected and needed a fix by looking at which other component baselines included that NavLib baseline.
In addition to managing reuse and dependencies, component hierarchies help with usability for large-scale development. Component hierarchies can be treated as a unit, so that you can operate on the full hierarchy in one step rather than operating on each component individually. For instance you can add (or remove) a component hierarchy to (or from) your workspace in one step, or accept pending changes for a component hierarchy in one step. This option is especially convenient for component-based development environments, where teams use components developed by other teams.
If two or more components depend on each other, it is called a circular dependency. Rational Team Concert SCM tolerates circular dependencies in component hierarchies, but marks them so that you can find and fix them.
Eclipse client
Navigate component hierarchy in the Team Artifacts view
Components with subcomponent relationships are organized as trees in the Team Artifacts view.

Add and remove sub-component
You can add any component within the workspace to another component as a child.

You can remove a subcomponent from its parent or from a workspace.

Note: All subcomponent changes are tracked in change sets. A new change set can be created to add and remove subcomponents. Changes are shown in the Pending Changes view.

Deliver and accept component hierarchy changes
Changing the component hierarchy is no different than modifying a file. The change is captured by a change set and flows to other streams or workspaces similar to regular file changes. If there is a conflict between change sets for component hierarchical changes, an automatic merge is performed to resolve the conflict.
Deliver and accept all changes for entire hierarchy
New operations are created to deliver or accept all changes for all components in the entire hierarchy.

Create baselines
When a baseline is created for a component that has subcomponents, it automatically creates baselines for all of its subcomponents and saves the relationships between them, so that the new baseline contains the information to reconstruct the entire hierarchy.
Replace with baseline hierarchy
You can now replace the entire component hierarchy with a baseline that was created earlier.

Add component hierarchy
Adding a component automatically adds the component and all of its subcomponents. If the component's subcomponents already exist in the workspace, you can choose to overwrite, skip, or cancel the operation.

Remove component hierarchy
Removing a component from the workspace automatically removes the component and all of its subcomponents that are not used by other component hierarchies in the workspace.
Command-line interface commands
Add and remove subcomponent
A new command-line interface command adds a component as a subcomponent of another component.
Usage: lscm add subcomponent [-r/--repository-uri] [-u/--username -P/--password | --certificate -P/--password | --smartCard -u/--username | --kerberos] workspace - The repository workspace to contain the component hierarchy changes. To specify the workspace, use its name[@repo], alias, or UUID[@repo]. parent-component - The parent component. To specify a component, use its name, alias, or UUID. subcomponents - The components to add as subcomponents to the parent component. To specify a component, use its name, alias, or UUID. Options: -r, --repository-uri - The URI that specifies the location of the repository. -u, --username - The user name for the repository. -P, --password - The password for the repository. --certificate - The file that contains the user's login certificate. --smartCard - Use the connected smart card for authentication. --kerberos - Authenticate with Windows user credentials using Kerberos/SPNeGO. Examples : C:\>lscm add subcomponent "My Project Area Stream Workspace" "Server" "Common Component" Component (3074) "Server" successfully added the following subcomponents in Change Set (3075): (3076) "Common Component"
Remove subcomponent
A new CLI command removes a component from its parent component.
Usage: lscm remove subcomponent [-r/--repository-uri] [-u/--username -P/--password | --certificate -P/--password | --smartCard -u/--username | --kerberos] workspace - The repository workspace to contain the component hierarchy changes. To specify the workspace, use its name[@repo], alias, or UUID[@repo]. parent-component - The parent component. To specify a component, use its name, alias, or UUID. subcomponents - The components to be removed from the parent component. To specify a component, use its name, alias, or UUID. Options: -r, --repository-uri - The URI that specifies the location of the repository. -u, --username - The user name for the repository. -P, --password - The password for the repository. --certificate - The file that contains the user's login certificate. --smartCard - Use the connected smart card for authentication. --kerberos - Authenticate with Windows user credentials using Kerberos/SPNeGO. Examples : C:\> lscm remove subcomponent "My Project Area Stream Workspace" "Server" "Common Component" Component (3074) "Server" successfully removed the following subcomponents in Change Set (3075): (3076) "Common Component"
Deliver and accept all changes for entire hierarchy
A new option, --component-hierarchy, is added to the lscm deliver and lscm accept commands to deliver and accept all changes for the entire component hierarchy.
Create baselines
The create baseline command automatically creates a baseline hierarchy if the component contains subcomponents.
Replace with baseline hierarchy
A new option, -hierarchy, is added to the lscm set component command to replace the entire component hierarchy with a baseline hierarchy.
Add component hierarchy
The add component command automatically adds the component and all of its subcomponents.
Remove component hierarchy
The remove component command automatically removes the component and all of its subcomponents that are not used by other component hierarchy.
Visual Studio and Shell clients
In the Visual Studio and Shell clients, you cannot see the component hierarchy information. However, you can still perform development operations, such as load, check in, deliver, and create baselines for the components that contain subcomponents.
Nested load feature
You can load the contents within a folder that is already in source control by using the Load As wizard and providing a location within an existing folder that is shared.
In this example, contents are already loaded:

The local path is nested in a shared folder:

The contents are loaded in the folders:

Move conflicts to another component in Eclipse and Visual Studio clients
Rational Team Concert SCM supports moving a folder and its contents to another component by using Team>Move In Repository. It's possible that, after a folder is moved from Component1 to Component2, someone makes changes to the content in the moved folder in a workspace that does not contain the move. Accepting this change set into the workspace with the move results in a Deleted <-> Modified conflict for any files that are moved. You now have the ability to apply the conflicting changes to another component.
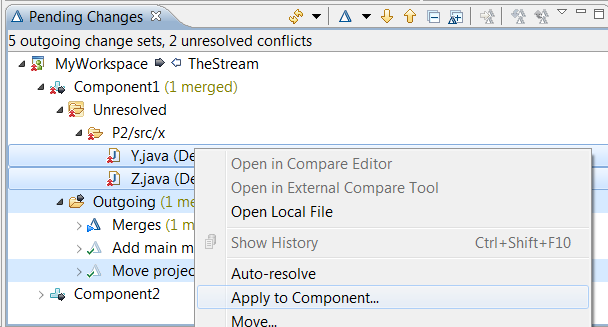
The following example shows that there are two Deleted <-> Modified conflicts for files contained in project P2, which was moved to Component2.

To apply these conflicts to the second component, click Apply to Component from the context menu of the conflicts, and choose the target component, Component2 in this example, from the component picker.
The conflicts are applied to the target component as a patch by using the Gap Editor. You must manually resolve any conflicts that do not auto-resolve.
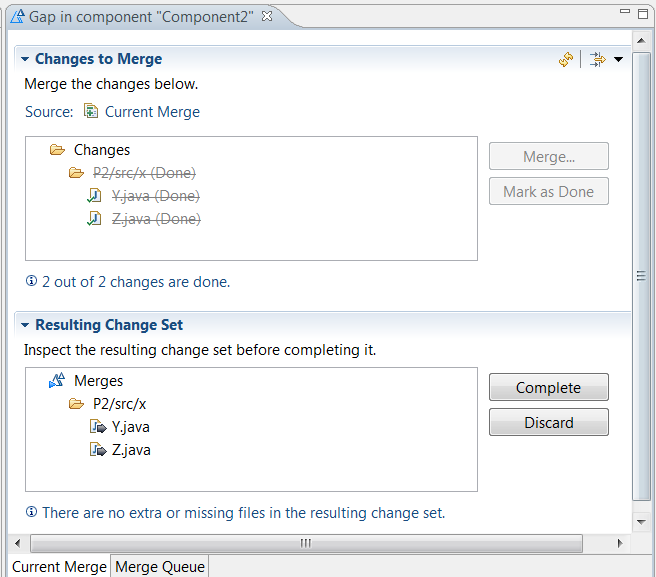
In this example, the changes auto-resolve, so you can complete the merge by clicking the Complete button.
New workspace configuration
Projects can now configure the default name and visibility used in the New Workspace wizard when workspaces are created from a stream. The default name is determined by using a pattern that can contain the variables ${stream-name} and ${user-id}. The default visibility can be Private, Public, or Project.
You can configure the workspace name pattern and visibility in the Source Control/New Workspace Configuration configuration data area in the project area editor of both the Eclipse and web clients. The following screenshot is from the web client:

This screenshot shows the default name that is used in the New Workspace wizard of the Visual Studio client when the user, mvalenta, creates a workspace from a stream named, TheStream:

Rational Team Concert and Git integration
SSH protocol support
The SSH protocol is one of the protocols that Git uses to communicate across repositories. Support is now included for process enforcement and work item linking when the Git client and server use the SSH protocol.
Setup deployment
The Rational Team Concert hooks .zip file now includes the SSH interceptor script. For more information, see SSH Protocol Support in RTC-Git Integration.
Using Git notes for work items: commit linking
Git notes are objects that are associated with Git commits, which are immutable. This feature maintains the Rational Team Concert work item information in notes, which can be edited later to change the work item links without having to change the commit itself. For more information, see Using Git Notes for Work Item - Commit Linking.
Node.js-based server to serve commit details
The commit page in the web client, which displays the commit information and file diffs, retrieves this information from the Git server. For more information about the Apache HTTP server setup, see Rational Team Concert and Git Integration: Setup Guide. For the SSH support, an improved method for retrieving the commit information from a Git repository is done with the Node.js-based lightweight server. For more information, see SSH Protocol Support in RTC-Git Integration.
Client for Microsoft Visual Studio IDE
Multiple Flow Targets
The Visual Studio client and Rational Team Concert Shell both now support multiple flow targets in the Pending Changes view, controlled by a new toolbar button in the view. This option is sandbox-specific and, by default, is turned off. After the option is enabled, each component entry in the workspace is repeated for each flow target.


Set the read-access permission during repository workspace creation
During the creation of a new repository workspace, you can select the visibility of the repository workspace that is created. This option is available during the creation of the repository workspace in the Client for Microsoft Visual Studio IDE and the Rational Team Concert Shell.
Pin the history and repository browser view
You can now pin the result of a file or component history. This ensures that if you want to view the history of another file or component, it is opened in a different window. You also get an option to pin the result in repository file browser.


The History and Search result view shows the time when the view was last refreshed.

Snapshot editor
You can now open snapshots in the editor in the Visual Studio IDE.

Show component's current baseline
The Visual Studio IDE has a new preference that shows the component's current baseline information. When you select the preference, the component's current baseline information is shown in the Pending Changes view, along with the component's name.
Support for Visual Studio themes
The Rational Team Concert client for Microsoft Visual Studio IDE now supports Visual Studio theme changes. In the current release, theme changes are supported only in non-editor views, such as the Team Artifacts and Pending Changes views. After you change a theme, you must restart Visual Studio.
Rational Team Concert Shell
Baseline properties
Rational Team Concert Shell now supports editing baseline properties. Apart from viewing the properties of a baseline, the name and description of a baseline can be edited.

Show component's current baseline
The Rational Team Concert Shell has a new preference that shows the component's current baseline information. When you select the preference, the component's current baseline information is shown in the Pending Changes view, along with the component's name.
Language selector for Rational Team Concert Shell
You can set the display language of Rational Team Concert Shell independently from the operating system language.
Rational Team Concert MS-SCCI Provider
Show component's current baseline
The Rational Team Concert MS-SCCI Provider has a new preference that shows the component's current baseline information. When you select the preference, the component's current baseline information is shown in the Pending Changes view, along with the component's name.
Enterprise platform extensions
Dependency build and promotion
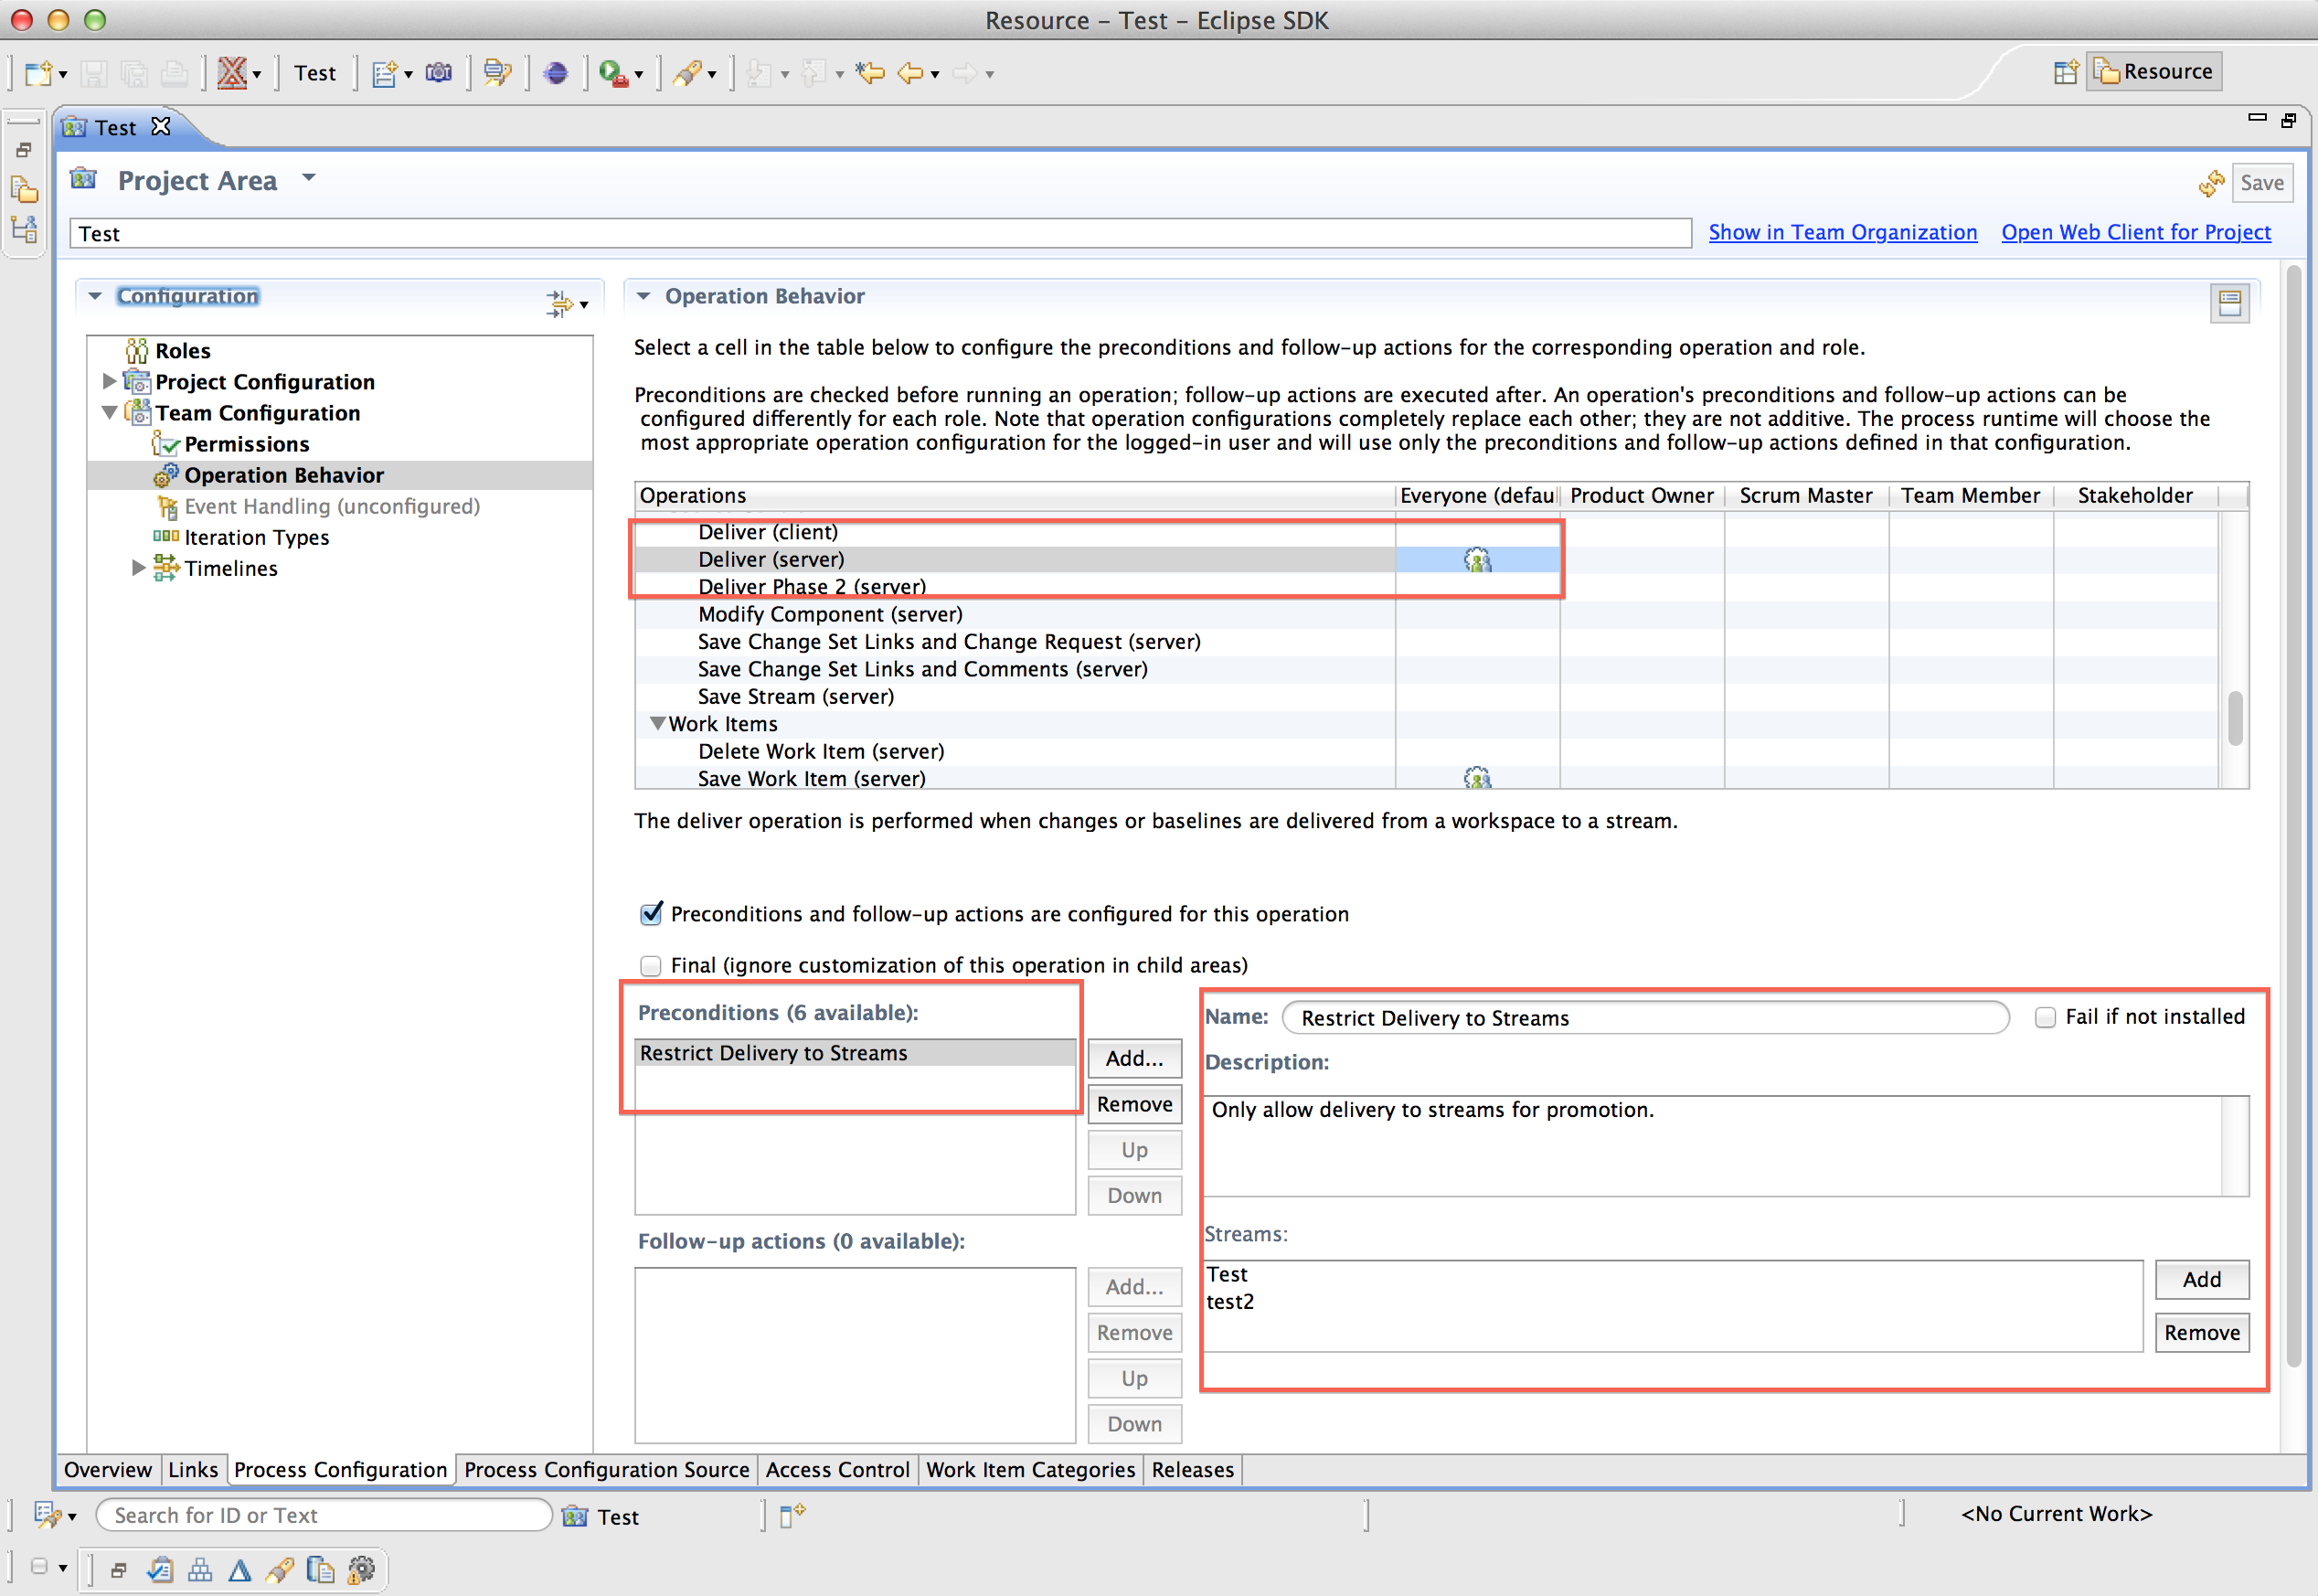
Prevent delivery to promotion target streams
A new precondition lets you deliver changes to target streams only for a promotion. It also prevents you from manually delivering changes to streams.
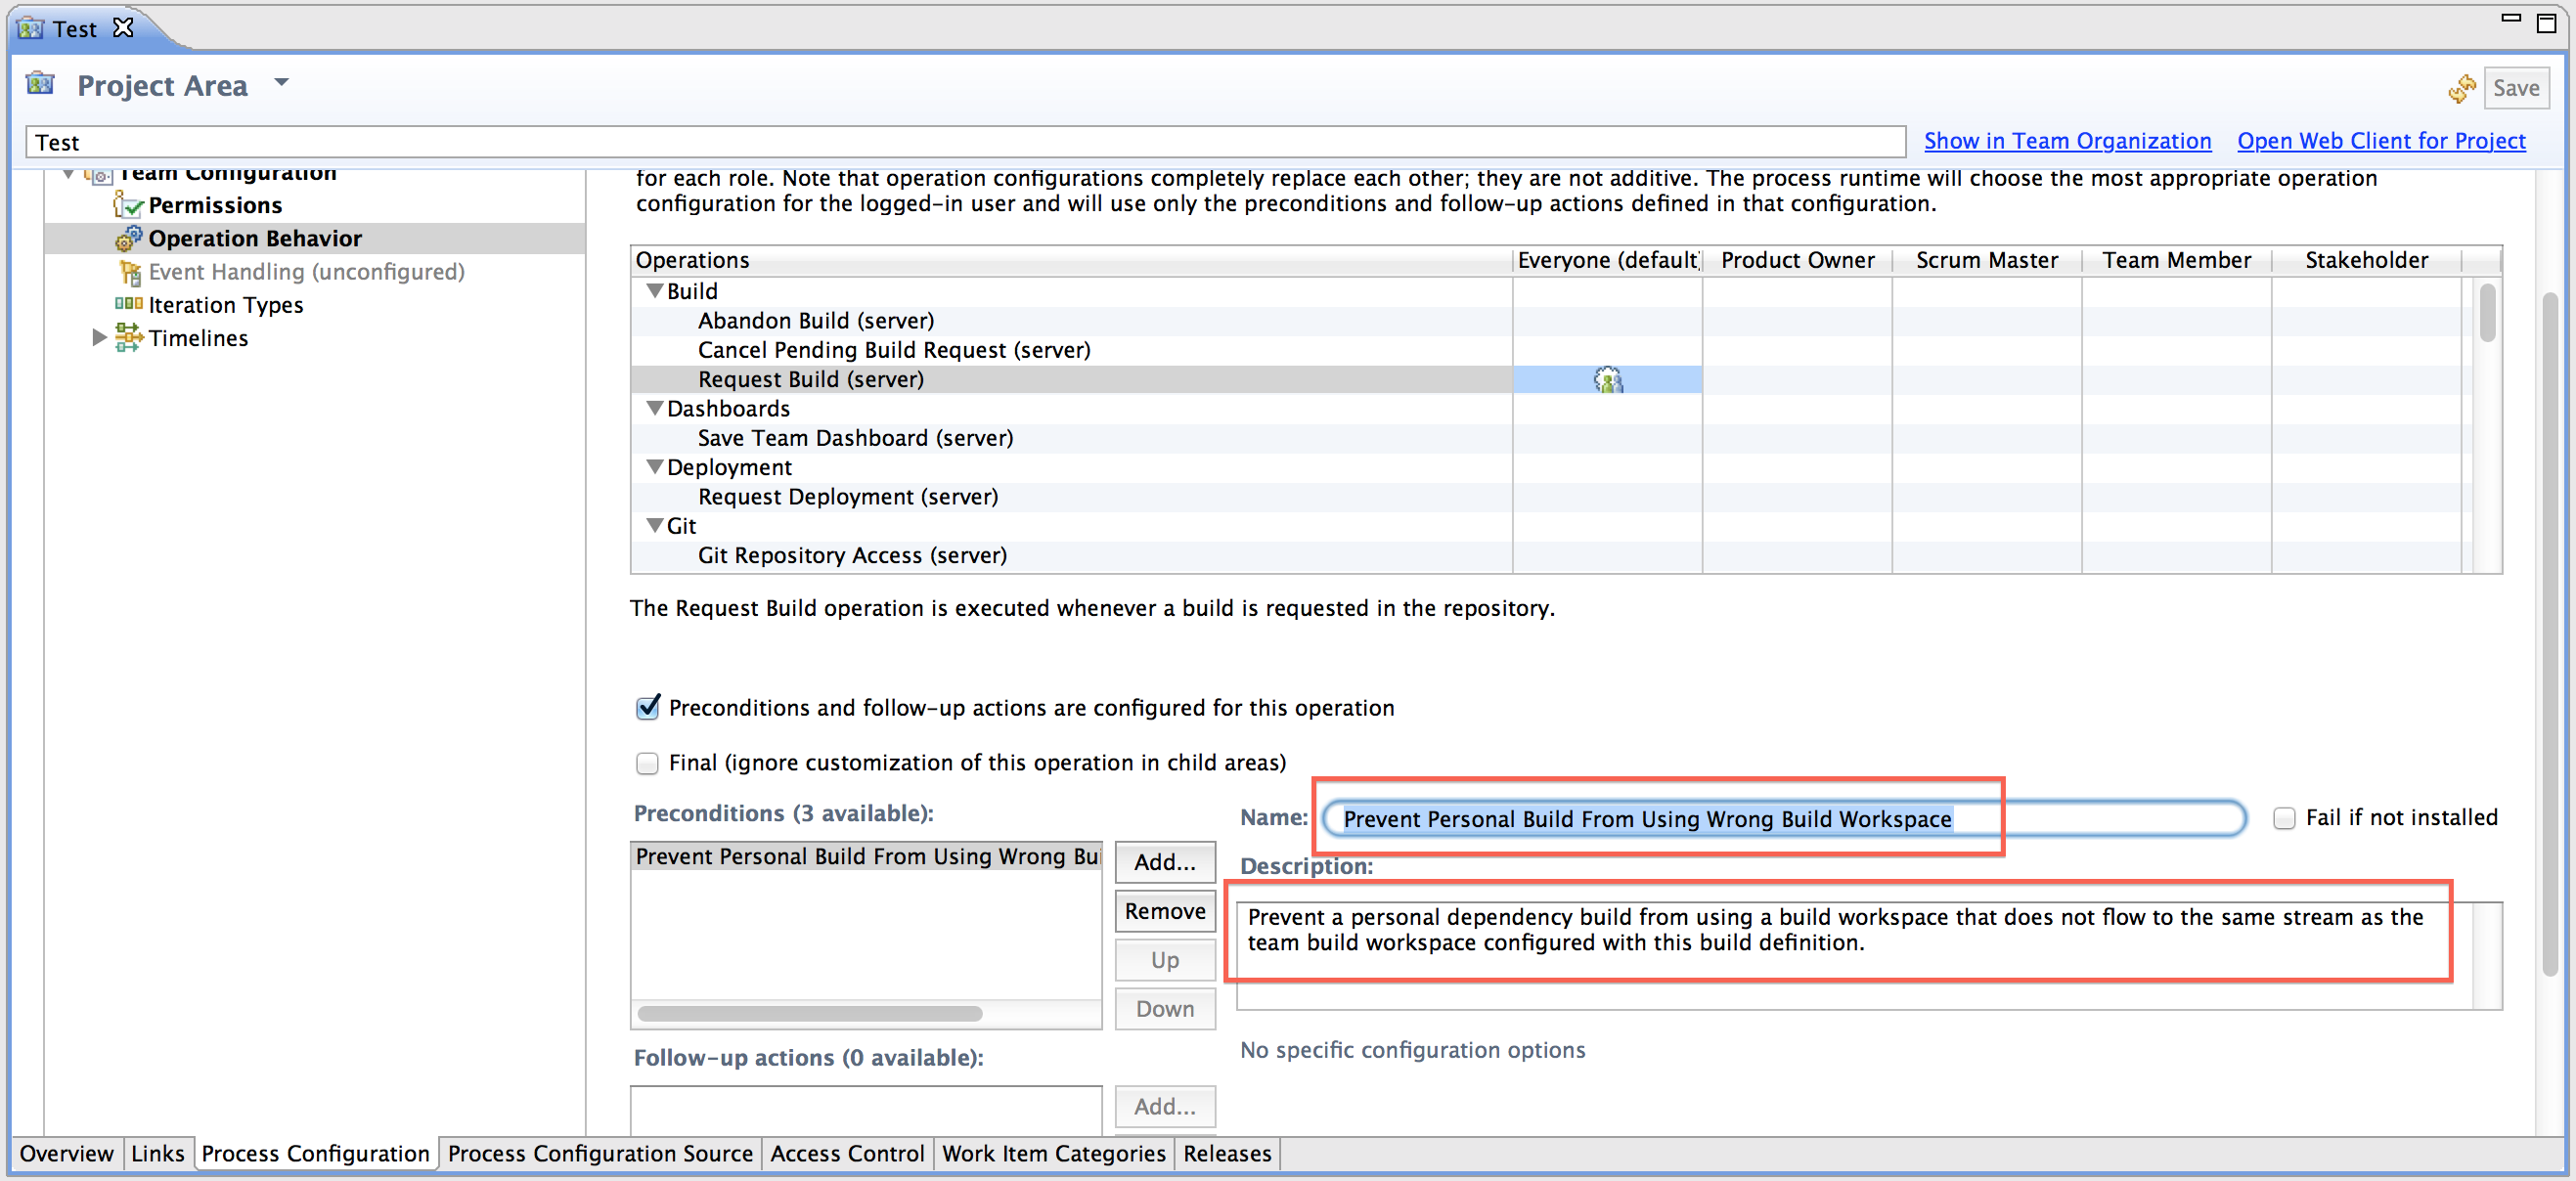
Prevent personal build from using wrong build workspace
A new precondition prevents you from requesting a personal dependency build when using a wrong build workspace.
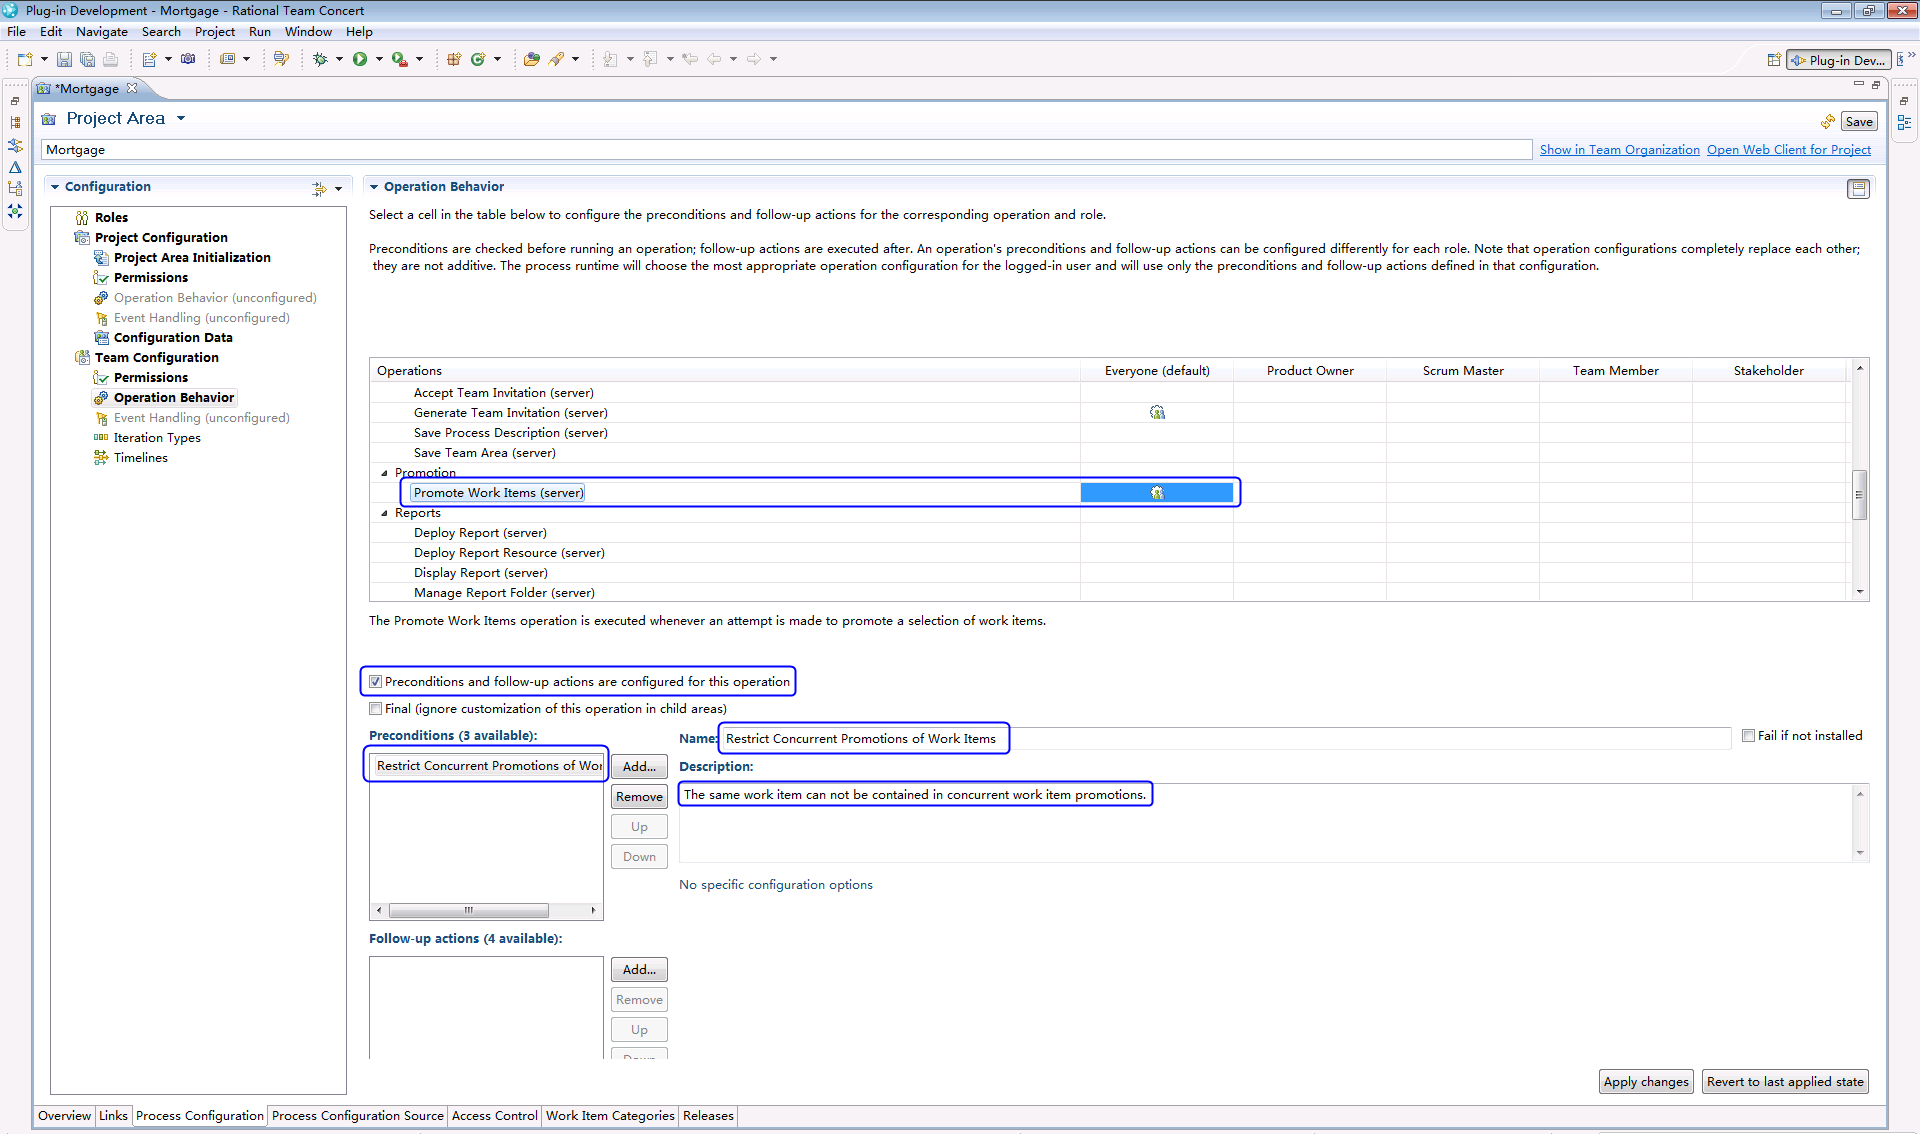
Restrict concurrent promotions of work items
A new precondition checks for a running promotion that contains the same work item. If a current promotion includes the same work items, the second promotion does not run.
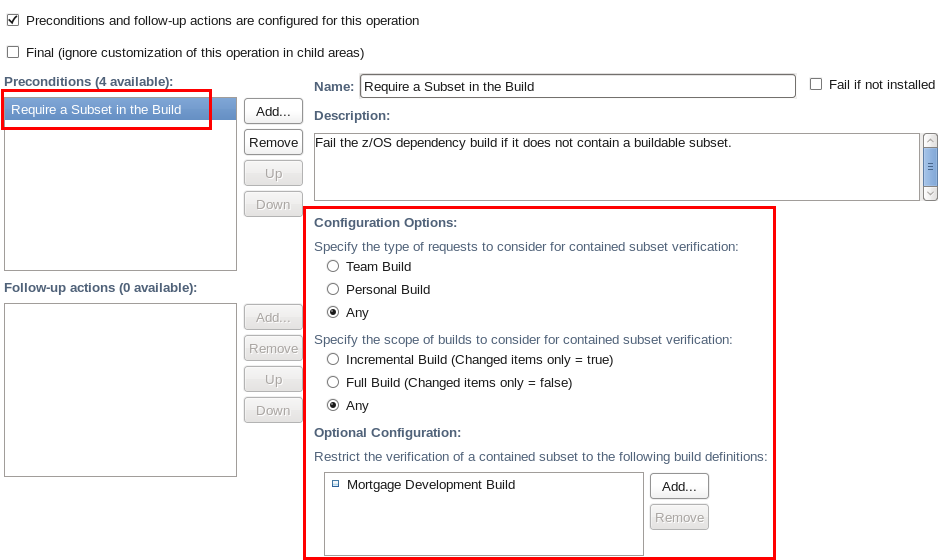
Require buildable subset in build
A new precondition enables you to require that a build is based on a buildable subset.
You can specify the type of builds and optionally restrict specific build definitions to require a subset.
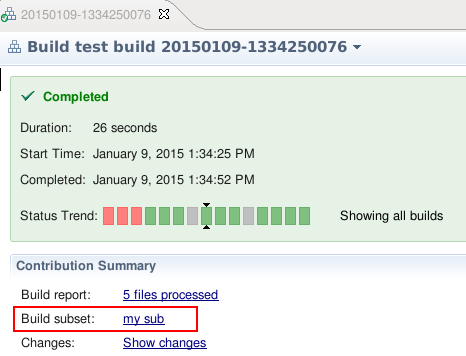
Build subsets keep track of work items
When you create build subsets from work items, the work item information is now stored. When you request a build using a subset, the work items that create the subset are associated with the build result.
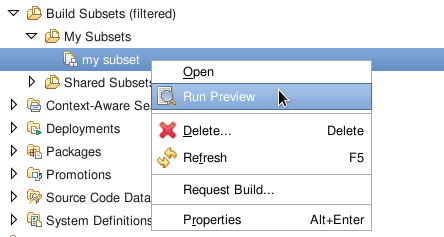
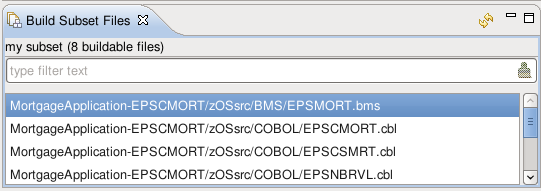
Previewing build subsets
You can select Run Preview from the build subsets context menu in the project area. The Run Preview option evaluates and displays the subset in a Build Subset Files view.
The toolbar of the subset editor also has a button to run a preview that includes unsaved changes in the editor.
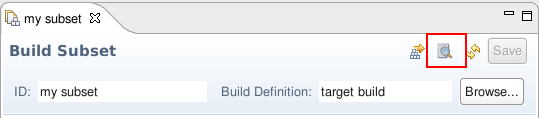
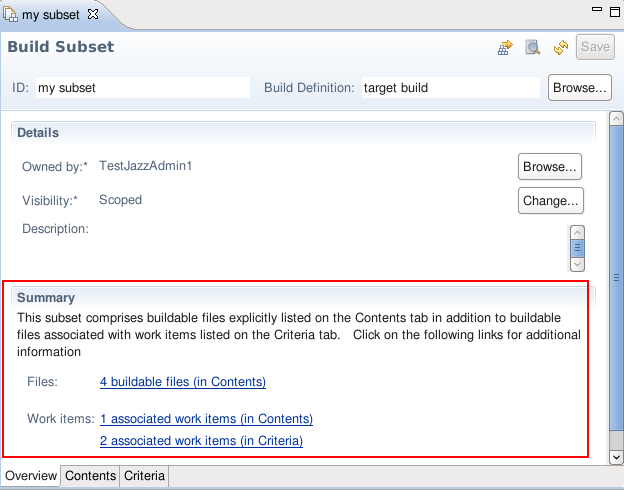
Build subset editor changes
The Overview tab displays a summary of the subset. The subset includes the number of buildable files and associated work items. The link for the number of files displays a file listing on the Contents page. The link for the number of work items displays the work items in the Work Items view.
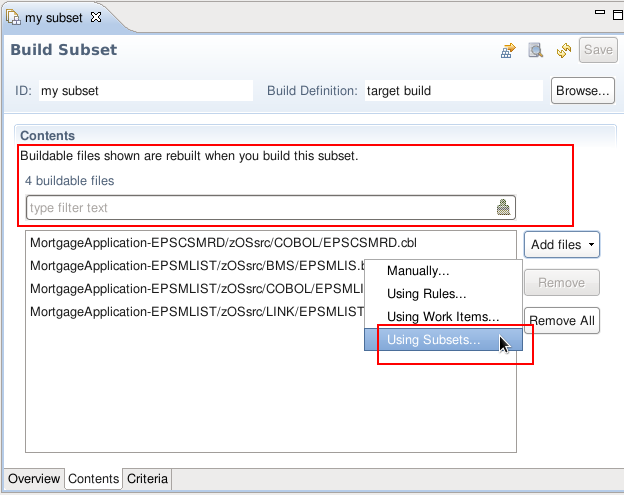
The Contents tab displays the list of files included in the subset. You can enter filter text that to determine whether a particular file is included in the subset. The filter supports the standard wildcards characters: asterisk (*) and question mark (?). The Add Files menu has a new option to populate the subset with other subsets.
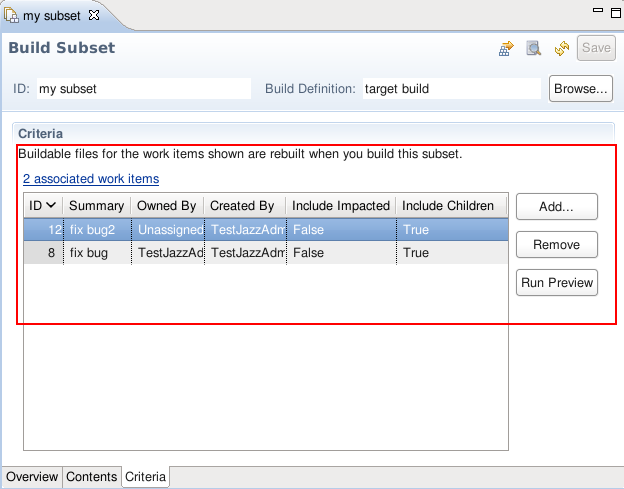
The Criteria tab displays work items that are evaluated during a build. Unlike adding subsets on the Contents tab, changes to these work items are automatically included in the subset. A Run Preview button is available to examine the current contents of the selected work items. The preview results are displayed in the Build Subset Files view.
Using builds subsets with different build definitions
When you select a build subset in the Request Build window, you can now select subsets that do not match the current build definition. The selection window initially displays the subsets for the current build definition, but an option is provided to view all subsets. If a project area is configured to filter subsets, the selection window has an additional option to display only the subsets that match the project area filters.
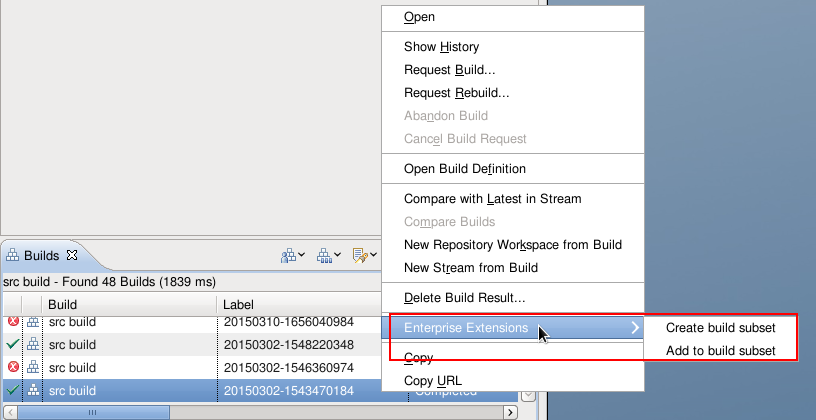
New ways to populate build subsets
The context menu for dependency build results has a new Enterprise Extensions submenu with options to create a new subset or add to an existing subset. The build reports from the selected build results are processed to determine which files are added to the subset.
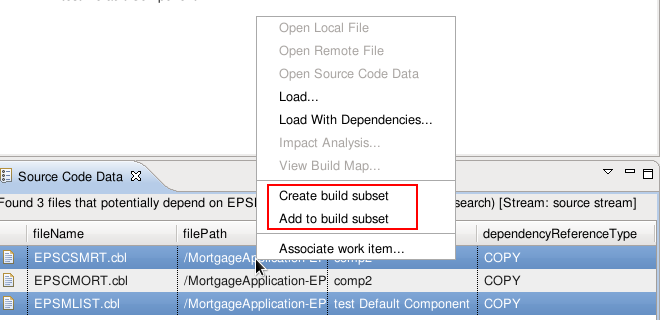
The context menu for source code data query results has similar options to create a new subset or add to an existing subset.
When you add files to a subset by using work items, promotion work item reports are now treated differently. The promoted work items that are attached to a work item report are processed as if you selected them directly.
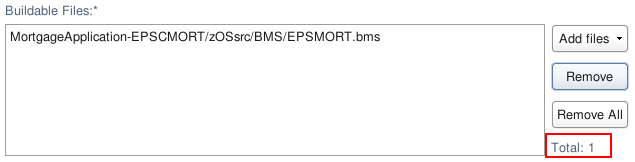
Subset editor
The Build Subset editor now displays the total count of the buildable files in the table.
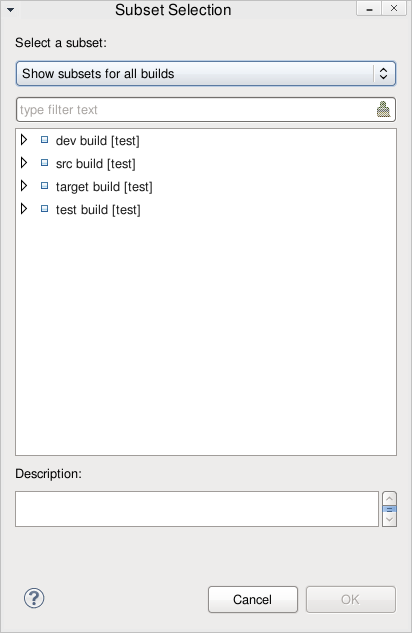
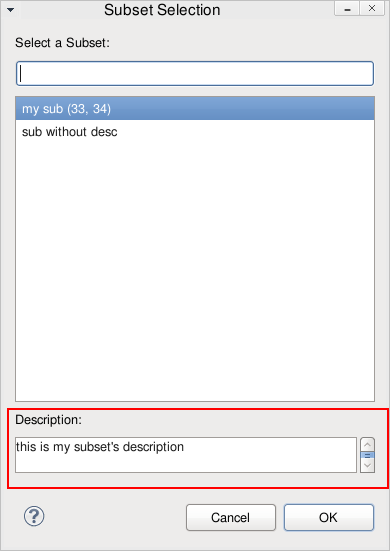
Subset window
The build Subset Selection window now displays the selected subset's description.
Subset process configuration
A new section is added to the process configuration of a project area for controlling a couple of default aspects of build subsets. On the configuration page, you can choose the default visibility for new subsets, as well as requesting a build directly from a subset results in a personal build (the current behavior) or a team build. These options only control the default settings in the web client and, in both cases, you can change them before saving the subset or requesting the build, respectively.

Subset displayed in build result editor
When requesting a build by using a subset, the subset is listed on the Overview page of the Build Result editor. To open the Subset editor, click the subset name. This link is only available in new build results.
Filters for build subsets
The Team Artifacts view displays all build subsets that are visible to a user, and the list of subsets can become large. A new option filters which subsets are displayed based on their build definitions.
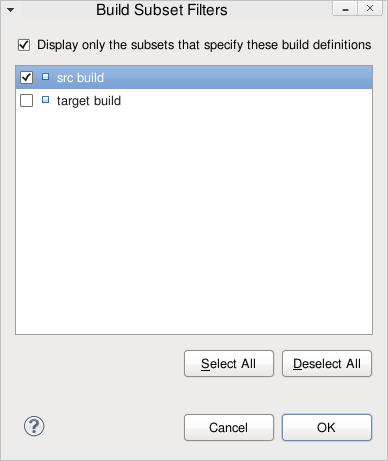
Right-click Build Subsets to see the Filters menu item.
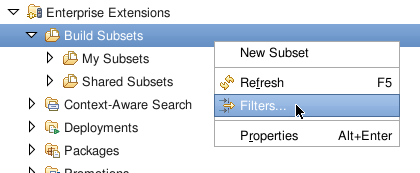
The Filters menu item opens a window, where you select the build definitions to display subsets.
Preserve physical file contents during IBM i promotion
The IBM i promotion build definition includes a new section for promoting physical files:
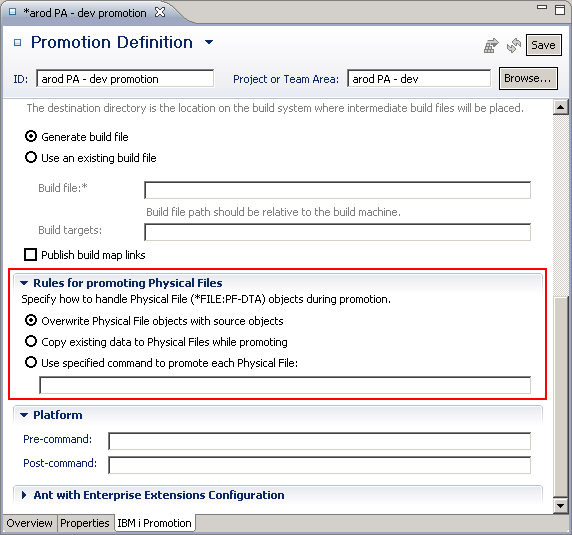
- Overwrite physical file objects with source objects: Select this option to promote physical files by copying the source physical files to the target library, as done in previous releases.
- Copy existing data to physical files while promoting: Select this option to migrate the physical file content.
- The migration of data in a physical file occurs when the physical file exists in the target library, and when it contains one or more data records.
- The migration is performed with the the IBM i CPYF command.
- The existing physical file in the target library is backed up as a temporary resource in case of failure.
- Use a specified command to promote each physical file: Select this option to migrate physical file content by using a user-specified command. The command syntax is free-form (no syntax checking) and can contain substitution variables.
After successful migration, the temporary object is removed.
IBM i load report improvements
The IBM i load report is enhanced to flag failed remote commands. The load report now includes the identifier and the severity on every received message.
Streamlined build logs
By default, the build log for the dependency build, packaging, deployment, and promotion templates and the IBM i build specification template is streamlined to only list properties for the first build activity.
You can restore the previous behavior by setting the com.ibm.rational.buildforge.buildagent.singletonPropertiesSet build property to false. You can enable this logging feature on other build templates by setting the property value to true.
Editor page for the build result details
A new Build Report editor is embedded in the build result. With the new editor, you can conveniently browse the build result details. As shown in the following image, you can use the pagination, sort, and search functions to easily find and view the build entry that you are interested in. In addition, related build artifacts are connected with the build entry. You can click the hyperlinks to find dependency sets, language definitions, and build maps. By clicking a source item, the Dependency Set view shows dependencies of the build file. The File Changed column indicates which files are changed in the dependency build. The Version ID column indicates the version of the file in the source control management system.

Double-click the output item in the report editor to open a build map editor that displays detailed information. Hyperlinks to the related artifacts enable you to conveniently view the build definition, system definitions, and repository workspace.

There are four tabs in the build map editor. In addition to the information mentioned previously, the input and output sections are displayed on separate tabs, and another tab displays a textual overview of the build map information.

Editor page for the build report
The link to the build report on the External Links tab of the build result now opens the build report in the Build Report editor page, instead of the web-style build report.

The Build Report editor page has a new preference page, where you can customize the number of rows displayed.

Pagination in the Build Report page is based on projects. Only one page exists if the build results are within the number defined in the preference configuration. Otherwise, results of different projects are distributed into different pages.
The following image is an example of a build result.

After you change the number of rows to display in the build report page to 5, the number of entries exceeds the maximum size of build report page. Each page only displays the entries in one project, such as in the following screenshot:

The Filter field in the build report page supports wild card matching, as shown in the following image:

The link to the build map is a stand-alone icon. Double-click the icon, and the build map is opened in the Build Map editor.

IBM UrbanCode Deploy integration
Generate z/OS packages that are deployable from IBM UrbanCode Deploy
You can use the functions of Rational Team Concert to select the content for a deployable package based on several criteria. For example, you can create a package for one or more work items. The packaging request examines the outputs that were built for those work items and finds where they were built. The packaging request then interacts with the z/OS toolkit in IBM UrbanCode Deploy to generate a deployable package for these outputs. This package is registered to the IBM UrbanCode Deploy server and can be deployed with processes defined in UrbanCode Deploy.

z/OS mass import tool
The zimport command supports alias dataset names
In the zimport mapping file, you can substitute an alias data set name in place of the name of the PDS to reference members in lines with the identifiers P, L, and X.
Loading files from the source code data view wizard
Load files in a local folder
In the Source Code Data view, when you right-click one or more files, from the menu, you can select either Load to load the selected files or Load with dependencies. On the "Repository files to load" panel, from the Load files wizard, there is a new "Advanced Options" option that you can use to specify a local folder instead of only the Eclipse workspace.

From the Advanced Options, you can either select an existing sandbox or create a new one to load into.
System Definitions
System symbol usage in data set definitions
The use of system symbols on z/OS is common for users. For example, a user can set a system symbol to define a CICS version for data set resolution.
Now, system symbols can be used in the data set name specified in a data set definition for all data set types except for the Temporary data set. System symbols are resolved during the build process on the build machine.
Associate a step name to a translator
A new column in the translators table identifies the step name associated with the translator.

Optionally, you can set the step name by using the translator editor. The value of a step name must be an alphanumeric string of less than nine characters.

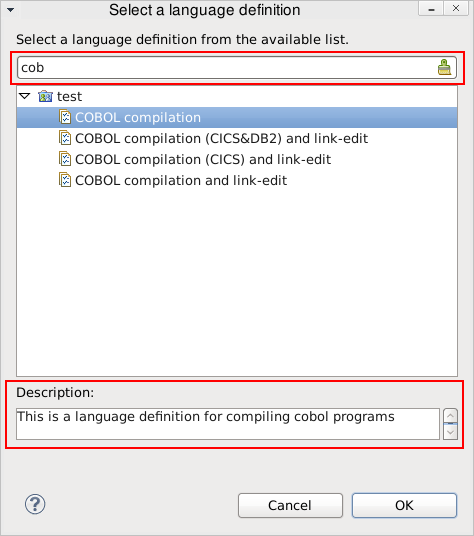
System definition selection windows
The various system definition selection windows now include a filter. You can use wild cards in the filter. An asterisk (*) matches any number of characters, and a question mark (?) matches any single character. A description is also displayed in this dialog for the selected system definition.
ISPF client
Component History view
From the History of a file panel, you can now request the Component History view. Type "HC" next to a change set from the History panel. Then, you can history of a component in the displayed panel. All of the change sets delivered for the selected component are displayed.

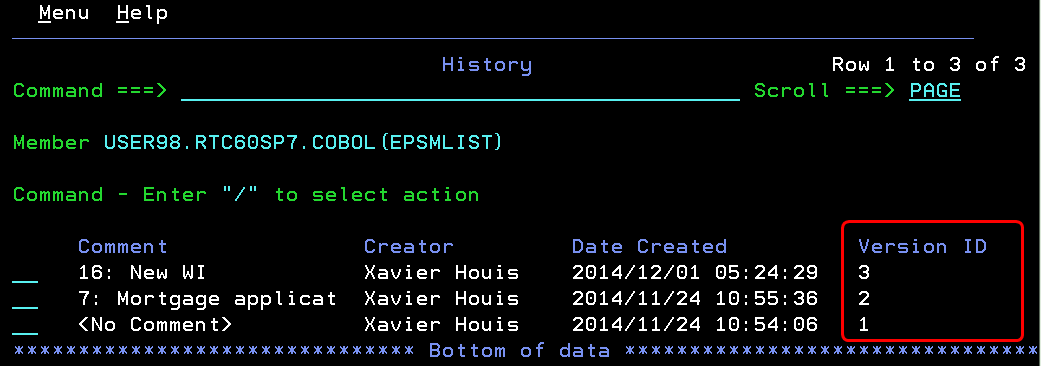
History view
The History of a file panel displays the Version ID of each change set returned on the list.
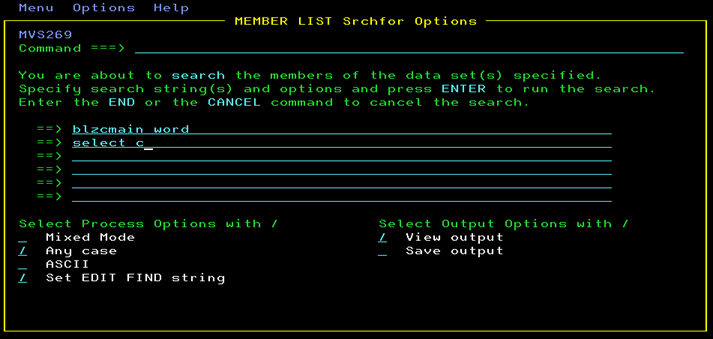
New SRCHFOR command that works in the same way as the ISPF SRCHFOR command
There is a new SRCHFOR option from the ISPF Client member list that allows you to search for a string or strings in the displayed list of members.
Enter the SRCHFOR command with a search string:
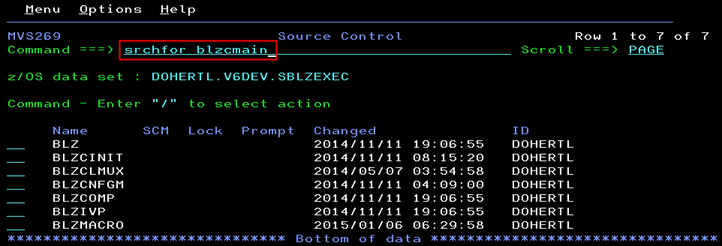
Any members found with the SRCHFOR string are marked with *Found in the Prompt column:

Entering SRCHFOR without a search string allows you to use additional search strings and options:
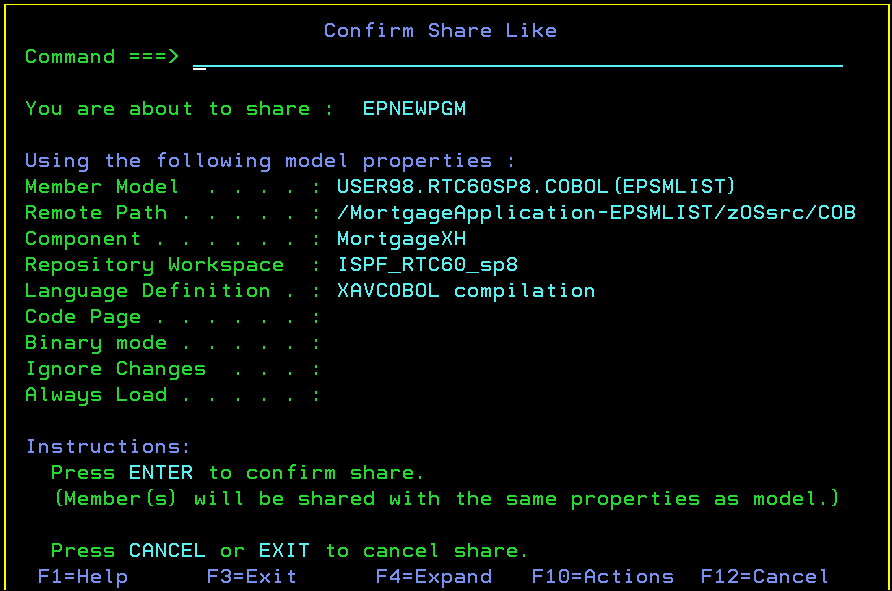
New Share Like operation to simplify the "share new members" process
There is a new Share Like (SL) action code from the ISPF Client member list that allows you to share new members, by using the same properties as a selected member model.
Enter the SL action code next to the new member to share:

A list of already shared members from the same data set sandbox is displayed.
Enter a slash next to the member to be used as a model for the share operation of the new member:

A confirmation panel is display, listing the member model properties that are used by the share operation of the new member:
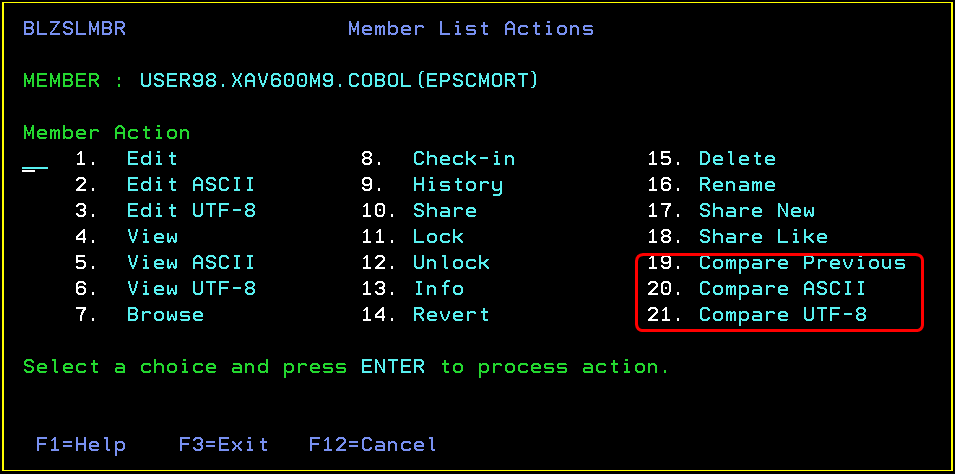
Repository compare in ISPF client
You can now open a local file in the compare and merge mode and compare a repository action code with the previous one from the sandbox loaded in the ISPF client.
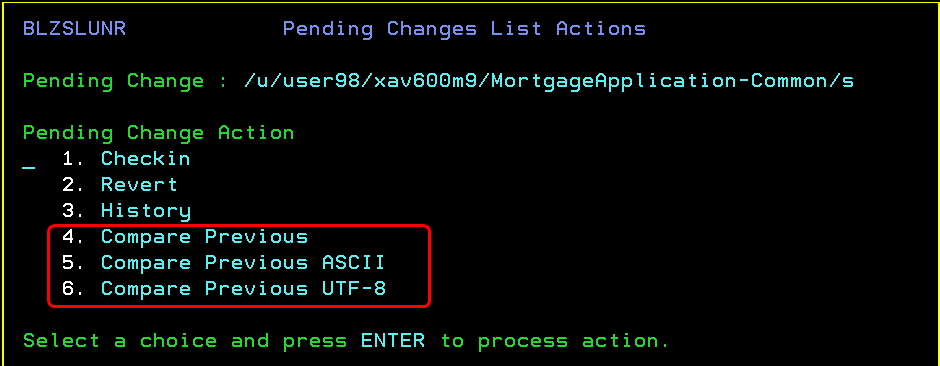
This new compare action is available from three different panels in the ISPF client: the data set member list, the z/OS Unix files, and the Pending Changes view.
- Enter a forward slash next to a data set member in your sandbox to display the new compare actions that are proposed.
- Type a forward slash next to a z/OS Unix file in your sandbox to display the new compare actions that are proposed.
- Type a forward slash next to an unresolved change to display the new compare actions that are proposed.
- Rational Team Concert Eclipse client
- Rational Team Concert client for Microsoft Visual Studio IDE
- Rational Team Concert browser-based clients
- Windows Explorer integration
- Command-line interface
- Jazz build engine
- Data Collection Component replaces the default CLM data collection tasks (Java ETLs). This application must be installed and configured to keep data in the data warehouse current.
- Report Builder provides useful out-of-the box reports for software lifecycle management and is integrated with CLM dashboards through the widget catalog.
- Lifecycle Query Engine indexes data from across lifecycle tools that support the tracked resource set (TRS) specification.

Rational Team Concert and single sign-on
Jazz Security Architecture single sign-on
Rational Team Concert supports Jazz Security Architecture single sign-on (SSO).
For more information, see the New and Noteworthy article for Jazz Foundation.
Rational Team Concert and Kerberos/SPNEGO
Rational Team Concert now supports Kerberos/SPNEGO-based authentication. The following Rational Team Concert clients can authenticate with a server that is configured for Kerberos/SPNEGO-based authentication:
For more information about getting started, see Configuring Kerberos single sign-on authentication.
Kerberos authentication in Enterprise Extensions build
Kerberos authentication is available in the build toolkit on z/OS and IBM i platforms and can be used in different types of build definitions (build, packaging, deployment, and promotion).
Reporting
Jazz Reporting Service
Jazz Reporting Service contains the following applications:
For more details about the current release of Jazz Reporting Service, see this page: Jazz Reporting Service 6.0
Licensing
Rational License Key Server lmgrd.log file output is different in 6.0
In version 6.0, the output of the Rational License Key Server lmgrd.log file includes the client access license (CAL) role type. For details, see the Collaborative Lifecycle Management New & Noteworthy page.
CLM Server Monitoring permanent and term licenses available in 6.0
In version 6.0, permanent and term authorized user licenses are available for CLM Server Monitoring. When you generate a permanent or term authorized user license or floating license for a CLM product from the License Key Center, the license includes the CLM Server Monitoring authorized user license. For details, see the Collaborative Lifecycle Management New & Noteworthy page.
Token license packaging in 6.0
Because of issues with generating both 5.0 and 6.0 token licenses from the License Key Center (the license generator would time out and no licenses were generated), version 5.0 licenses are no longer generated when you generate 6.0 token licenses. The only exception is for Rational DOORS 9.6 customers, where 5.0 and 6.0 token client access licenses (CALs) are generated for Rational DOORS Next Generation Analyst and Rational DOORS Next Generation Contributor. All other licenses are generated for version 6.0 only. For version 5.0 token licenses, contact IBM Support.